
Reports and Analytics User Guide
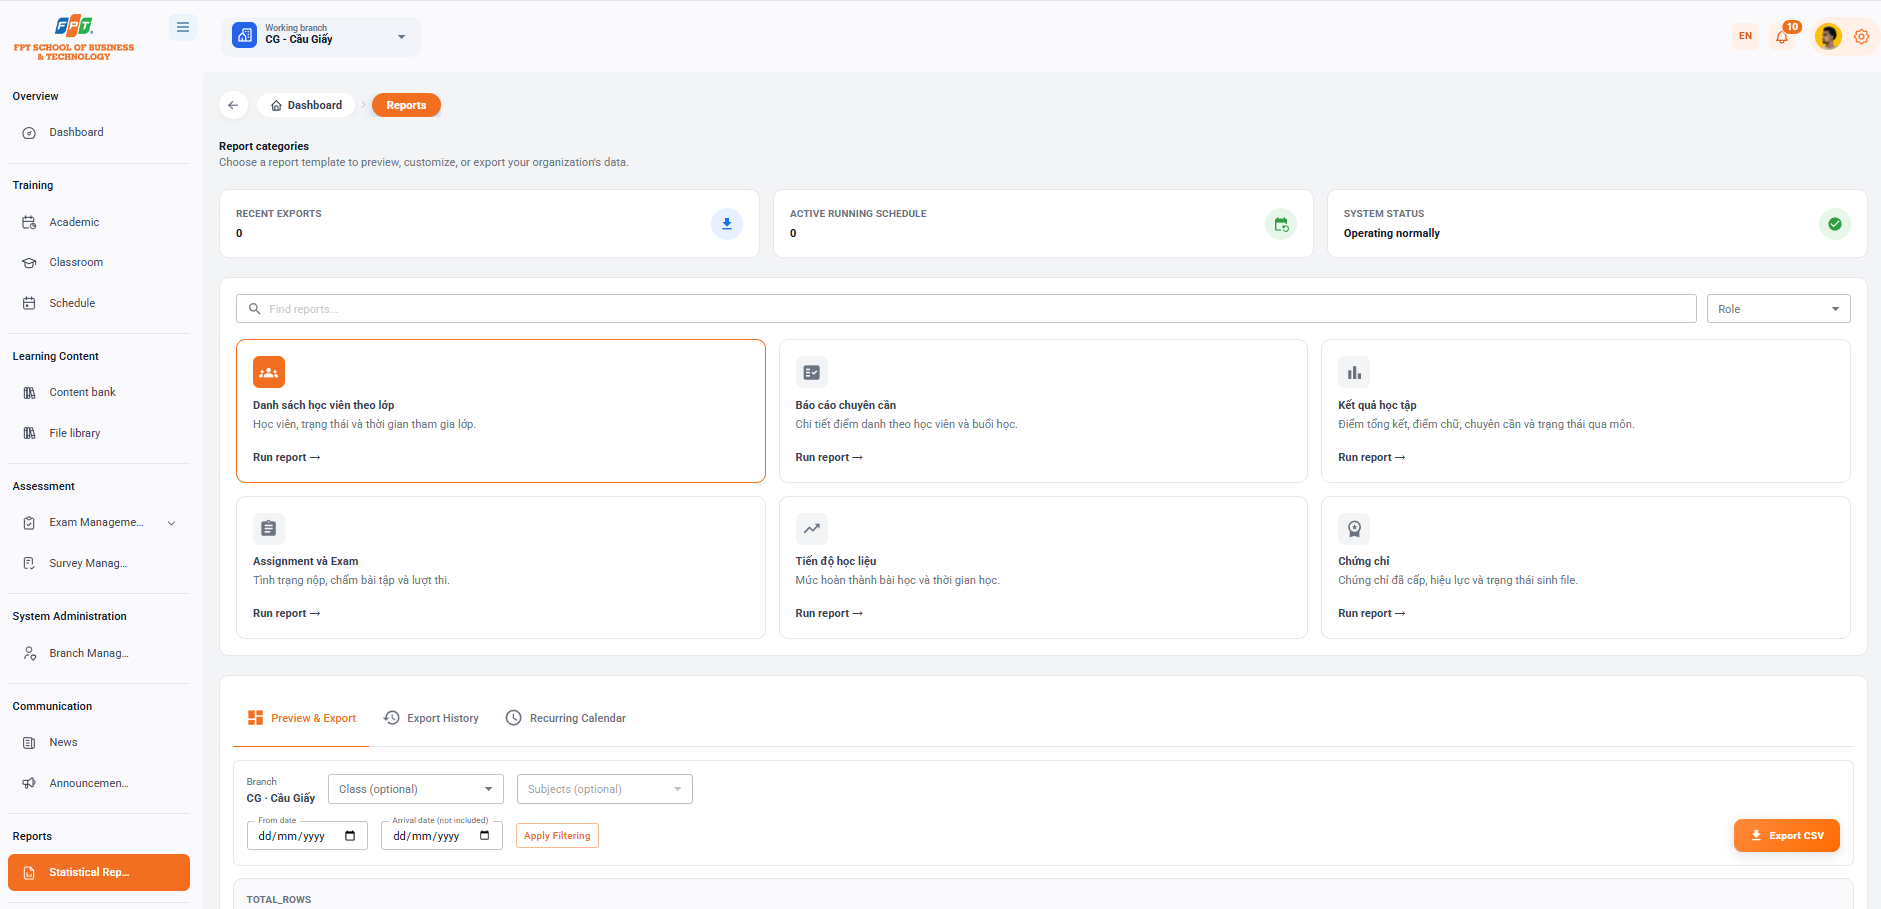
The Statistical Reporting system is a category of Alerts that allows managers to customize, preview and export comprehensive statistical data of an organization/branch across multiple standard reporting templates.
10.1. Report Interface Overview
- Breadcrumb: General > Reporting
- The general statistics:
- Recent exits: The number of reports that have made the most recent file exits (e.g. 0).
- Active running calendar: Calendar number of automatically running reports (e.g. 0).
- System status: Reported server connection status (Good performance).
- The search & learning role:
- Search: Enter the report template name in the Search report cell.
- Read Roles: Read the list of reports by decoding user roles from the drop down menu to Roles.
10.2. Report Template Catalog
The system provides in-depth report types, users click Run Report → at each card to select the corresponding data type:
- List of students by class: Statistics of the list of students, learning status and time spent in the class.
- Specialised report: Details of the student's grade points and each class.
- Academic results: Statistics of the summary score, the spelling, the qualifications and the status of the subject.
- Assignment and Exam: Status of submission, assignment scores and entrance exams.
- Learning progress: The level of completion of the lesson and the total time of study.
- Certificate: Statistic list of certificates issued, validity and status of the file.
10.3. Previewing and Exporting Report Data
10.3.1. Data Export Tabs
- View Before & After tab: Adjust filter parameters to show the snapshot directly before downloading.
- History tab: See the list of previously downloaded report files.
- The U. S. Calendar tab: Configures the time automatically to issue and submit periodic reports.
10.3.2. Report Filters
Before extracting data, set parameters at the filter toolbar:
- Branch: Automatically fixed according to the work branch (e.g. CG - Cau Giay).
- Classes: Select a class from the drop-down list to Class (optional).
- Education: Follow the specific subject in the Education (optional) list.
- Time: Select the start date at From date and end date at Arrival date (not included).
- Apply: Select [Apply Filters] to load data into the preview table.
10.3.3. Previewing and Exporting Data Files
- Preview data table: Displays standardized information schools including: Class Code, Class Name, Student Code, Name, Status, Date of entry into class.
- Line index (TOTAL_ROWS): Displays the total number of records that meet the filtering conditions.
- Data extraction: Click the [Excludes CSV] button in the right corner of the toolbar to download the.csv file report to the computer. The following is a documentary section of the Guide to Use of Publish History Management & Periodic Reporting Calendar (located in the Newsletter section) compiled in sequence with the standard hierarchical title format (Heading 1, 2, 3...) for Google Docs:
10.3.4. Managing Export History

The Exit History tab helps users review all recent data extraction requests and download backups of successfully processed reports.
- Search and refresh:
- Search: Enter the file name in the Search report box... to quickly filter the output request.
- Update button: Tap the RETRON icon to update the latest data processing status.
- Details of the release history:
- Report name: The name of the type of report that is extracted (e.g. class_roster).
- Status: The state of the system's processing (e.g. blue label Complete).
- Time of creation: Time of execution of the request (e.g. 15:34 19hg 8, 2026).
- Line number: Total number of data records extracted (e.g. 0).
- Error: Displays technical error details if the file export process encounters a problem.
- Activation: Click on the [Download name icon] to download the computer report file.
- Page classification: Customize the number of records displayed in Rows per page (default 10) and move pages through navigation buttons.
10.3.5. Configuring Scheduled Reports
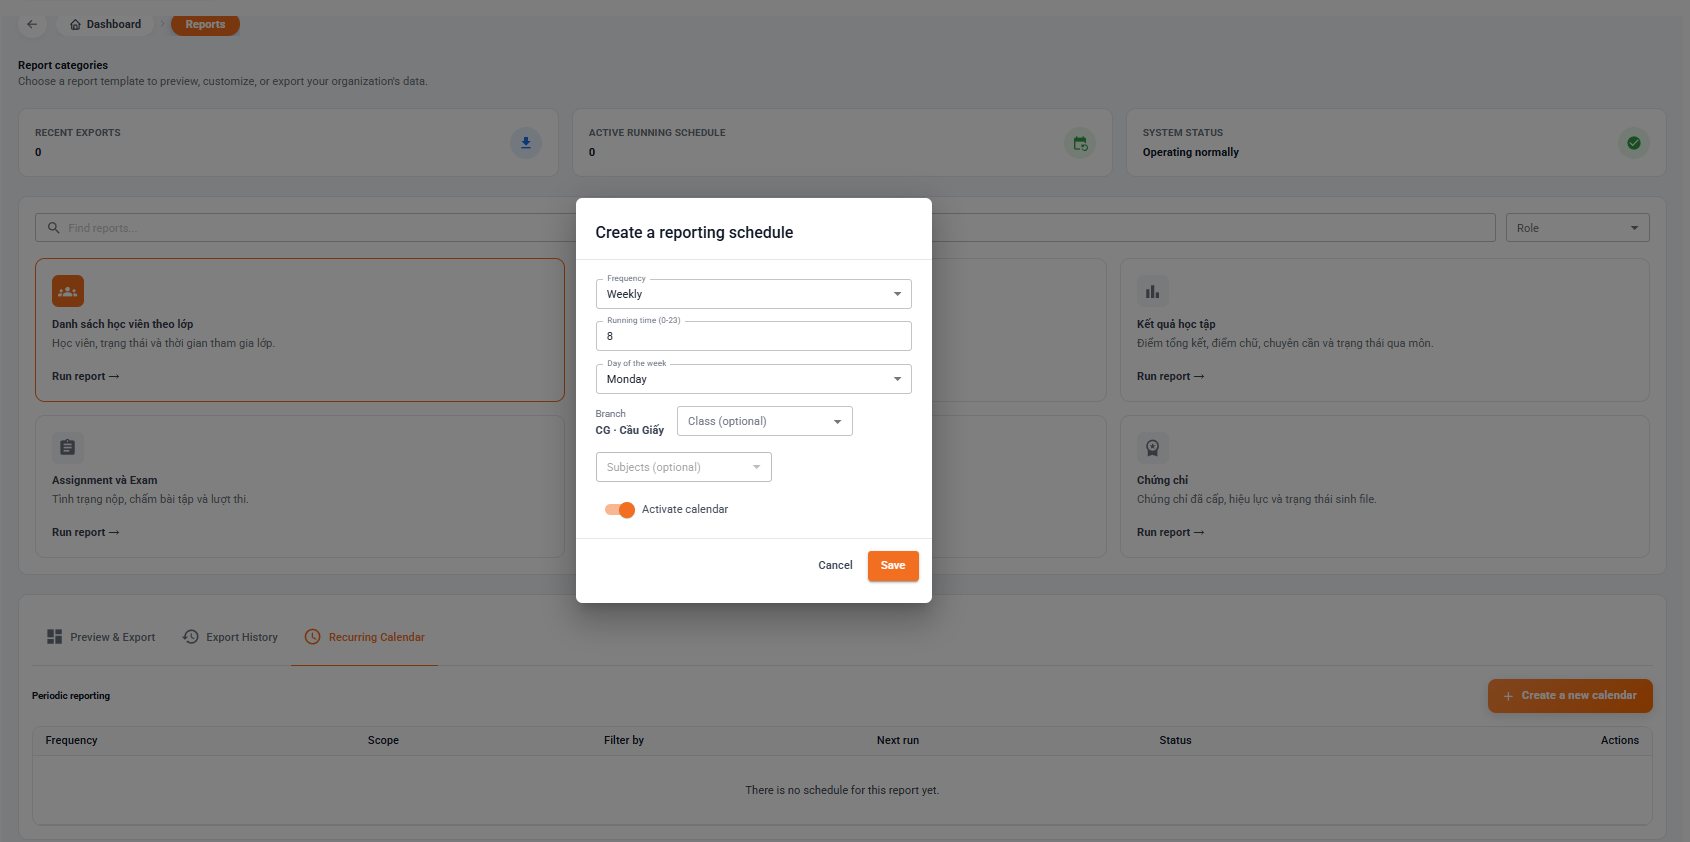
The U. S. Calendar tab supports the automatic timing setup for the automated system to synthesize and extract reports by cycle.
1. Managing Scheduled Reports
- Start button: Click the [+ Create new calendar] button (orange) to set up the automatic report extraction cycle.
- Table information: Manage the calendar lists created including Frequency, Range, Linearity, Next Running Time, Status and Action.
- Empty status: When not yet set, the system displays the message "No calendar for this report".
2. Creating a New Report Schedule
When clicking [+ New Calendar], the Report Calendar dialog box appears with the configuration information:
- Frequency (*): Select automatically extracted cycles from the drop-down list (e.g. Weekly, Daily, Monthly).
- Running time (0-23) (*): Enter the time mark on the day the system will automatically run the extract (e.g. 8 corresponds to 8:00 AM).
- The day of the week (*): Select the day of the week (e.g. Monday).
- Scope & Filtering Conditions:
- Branch: Automatically fixed according to the work branch (e.g. CG - Cau Giay).
- Class (optional): Select the specific class that needs to be scheduled.
- Education (optional): Select a specific subject that needs to be followed by a calendar.
- Activation mode: Switch the Activation button to orange so that the calendar starts to work immediately after saving.
- Complete: Click on the [Save] button (orange) to create a calendar or click on [Remove] to close the window.